Tutorial: Transaction using the Checkout UI
In this tutorial, you create transactions in USD between:
- A user and the publisher
- A user and another user
Allow about 15 minutes to complete this tutorial.
This tutorial consists of two separate transactions that are created by the AuthorizeInvoice api and completed in the Tilia-hosted Checkout UI. While the transaction process is the same in both cases, the differences appear in the structure of the transaction request body.
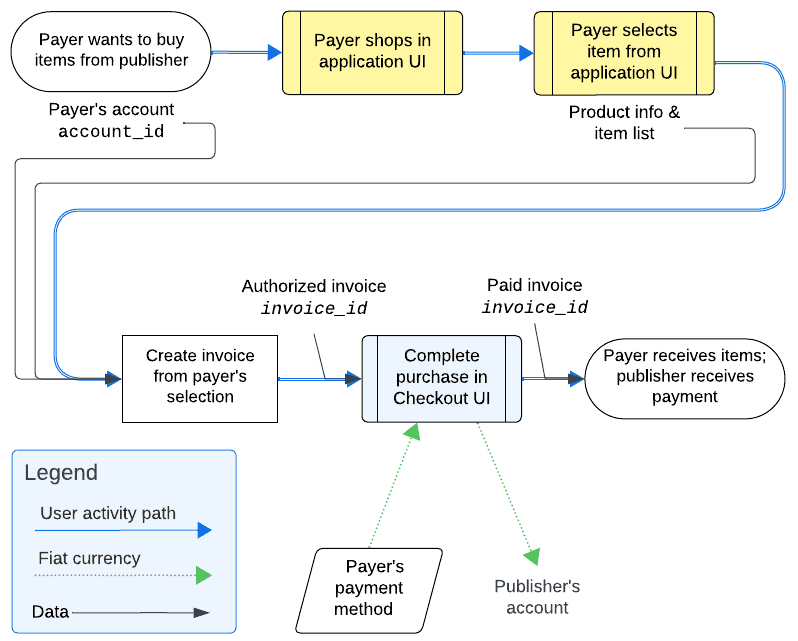
The following diagram shows a successful user-to-publisher transaction that uses the Checkout UI.

API operations in this tutorial
| Tutorial interaction | API operations used | Scope |
|---|---|---|
| Create user-to-publisher transaction that uses the Checkout UI | AuthorizeInvoice | write_invoices, write_user_tokens |
| Create user-to-user transaction that uses the Checkout UI | AuthorizeInvoice | write_invoices, write_user_tokens |
To complete this tutorial
This tutorial uses the Explore Tilia transactions collection from the shared Postman workspace.
To complete this tutorial successfully:
- Make sure the software described in Get started with the tutorials has been installed on your system and configured.
- Make sure that you have initialized the Tilia Client Info environment variables by running the User account tutorials .
-
In Postman:
- Open the Tilia tutorial workspace you created in Get started with the tutorials for this tutorial.
- Make sure you have the Explore Tilia transactions collection forked to your Tilia tutorial workspace .
-
Make sure that you've selected the
Tilia Client Info
environment and confirmed that it has:
- Your Tilia developer credentials.
- All of the user-related environment variables with Current values defined.
- In your Tilia tutorial workspace , open the list of Collections .
- In the list of Collections , expand the Explore Tilia transactions collection.
- If it's been more than an hour since you last got an access token for this collection, get a new one as described in Tutorial: Transactions overview , and then return to continue here.
Create user-to-publisher transaction
This exercise creates a user-to-publisher invoice in which the user buys some digital goods from the publisher and pays for them in USD.
Creating an invoice starts with collecting all the required information, and then sending it to Tilia to create the complete invoice. By sending the invoice details to the AuthorizeInvoice API, instead of returning an invoice to the application for subsequent payment, the API returns a URL to the Tilia-hosted Checkout UI with the invoice details. The user completes the purchase and the invoice in the Tilia-hosted Checkout UI.
Prepare the user-to-publisher invoice
The invoice data is collected in the request body object that is sent to AuthorizeInvoice. The invoice data used in this example is shown here.
Notice that each line item has a transaction_type value of user_to_integrator. With this value, the recipient is the publisher and so no recipient value is required.
{
  "account_id": "{{payers_account_id}}",
  "is_escrow": false,
  "invoice_mechanism": "tilia_hosted",
  "reference_type": "authorize_purchase_demo",
  "reference_id": "authorize_demo: {{$timestamp}}",
  "line_items": [
    {
      "description": "Product 21 description",
      "product_sku": "Product 21 SKU",
      "transaction_type": "user_to_integrator",
      "currency": "USD",
      "amount": 1100
    },
    {
      "description": "Product 22 description",
      "product_sku": "Product 22 SKU",
      "transaction_type": "user_to_integrator",
      "currency": "USD",
      "amount": 300
    }
  ]
}
To send this information and create a new user-to-publisher transaction, in Postman:
- In the Explore Tilia transactions collection, in the Transaction with publisher using the checkout UI folder, open the Authorize invoice request.
- In the request Body tab, notice that it has the information described previously.
- In the Authorize invoice request, choose Send .
- After the response returns, open the response Body tab below the request to review the response body details.
-
From the response body, copy and save the value of the
payload.redirectproperty to use in the next exercise.
A typical response body looks like the following.
{
    "status": "Success",
    "message": [],
    "codes": [],
    "payload": {
        "nonce_auth_id": "c72f809a-9e38-4540-908f-8fbfdb598d9b",
        "authorized_invoice_id": "193f3f8d-6e9f-4e4d-84c1-1951171378a5",
        "redirect": "https://pub.staging.tilia-inc.com/tilia-test/checkout/c72f809a-9e38-4540-908f-8fbfdb598d9b?authorized_invoice_id=193f3f8d-6e9f-4e4d-84c1-1951171378a5&is_escrow=false&is_virtual=false"
    }
}
Pay the user-to-publisher invoice
The payload.redirect value from the previous exercise is the URL to the Tilia-hosted
Checkout UI with the details of the invoice already loaded and ready for payment.
To pay the invoice using the Checkout UI:
- Open another browser window.
-
In the address bar of the new browser window, paste the
payload.redirectvalue from the previous exercise and navigate to that page. - The Checkout UI for that invoice should open. In the Checkout UI, select the payment method and complete the purchase.
- After the transaction finishes processing, choose Done to exit.
At this point, the transaction has completed. In an application context, the user would return to the application.
Visit Next steps for information about how to view the transaction details of this, and other transactions, or continue to the next exercise.
Create user-to-user transaction
This exercise creates a user-to-user invoice in which the user buys some digital goods from another user and pays for them in USD.
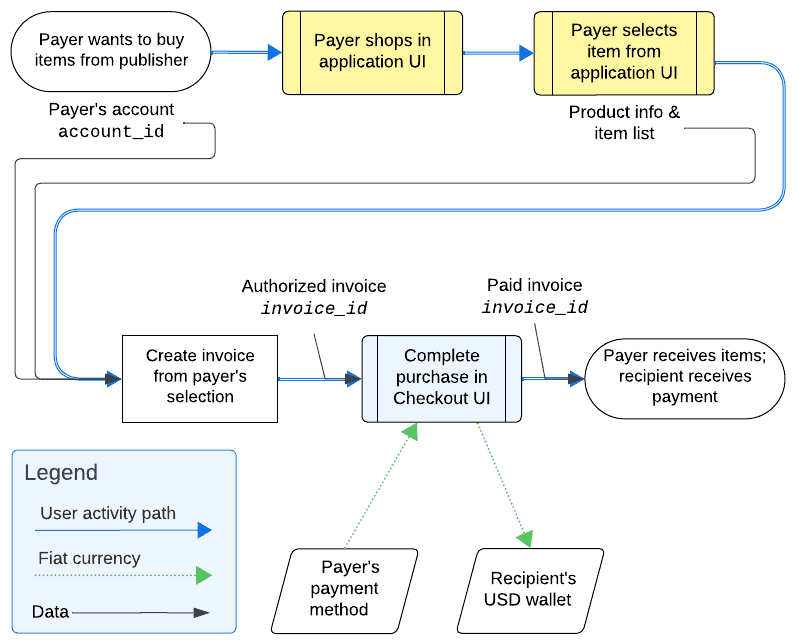
The process for this type of transaction, shown in the following image, is very similar to that of the user-to-publisher example described earlier.

In a user-to-user transaction, the recipient must be specified in the invoice line items.
Creating a user-to-user invoice starts with collecting all the required information, and then sending it to Tilia to create the complete invoice. By sending the invoice details to the AuthorizeInvoice API, instead of returning an invoice to the application for subsequent payment, the API returns a URL to the Tilia-hosted Checkout UI with the invoice details. The user completes the purchase and the invoice in the Tilia-hosted Checkout UI.
Prepare the user-to-user invoice
The invoice data is collected in the request body object that is sent to AuthorizeInvoice. The invoice data used in this example is shown here.
Notice that each line item has a transaction_type value of user_to_user.
With this value, the recipients must be specified in the recipients property.
Also, notice that in the recipients objects:
-
The
source_wallet_idis not used so the payer's default wallet is used. -
The
destination_wallet_idis not used so the default wallet in the account identified bydestination_account_idis used.
{
"account_id": "{{payers_account_id}}",
"is_escrow": false,
"invoice_mechanism": "tilia_hosted",
"reference_type": "authorize_purchase_demo",
"reference_id": "authorize_demo: {{$timestamp}}",
"line_items": [
        {
        "description": "Product 21 description",
        "product_sku": "Product 21 SKU",
        "transaction_type": "user_to_user",
        "currency": "USD",
        "amount": 1100,
        "recipients": [
            {
                "amount": 1100,
                "description": "digital good",
                "destination_account_id": "{{recipients_account_id}}"
            }
        ]
        },
        {
        "description": "Product 22 description",
        "product_sku": "Product 22 SKU",
        "transaction_type": "user_to_user",
        "currency": "USD",
        "amount": 300,
        "recipients": [
            {
                "amount": 300,
                "description": "digital good",
                "destination_account_id": "{{recipients_account_id}}"
            }
        ]
        }
    ]
}
To send this information and create a new user-to-user transaction, in Postman:
- In the Explore Tilia transactions collection, in the Transaction between users using the checkout UI folder, open the Authorize invoice request.
- In the request Body tab, notice that it has the information described previously.
- In the Authorize invoice request, choose Send .
- After the response returns, open the response Body tab below the request to review the response body details.
-
From the response body, copy and save the value of the
payload.redirectproperty to use in the next exercise.
A typical response body looks like the following.
{
    "status": "Success",
    "message": [],
    "codes": [],
    "payload": {
        "nonce_auth_id": "c72f809a-9e38-4540-908f-8fbfdb598d9b",
        "authorized_invoice_id": "193f3f8d-6e9f-4e4d-84c1-1951171378a5",
        "redirect": "https://pub.staging.tilia-inc.com/tilia-test/checkout/c72f809a-9e38-4540-908f-8fbfdb598d9b?authorized_invoice_id=193f3f8d-6e9f-4e4d-84c1-1951171378a5&is_escrow=false&is_virtual=false"
    }
}
Pay the user-to-user invoice
The payload.redirect value from the previous exercise is the URL to the Tilia-hosted
Checkout UI with the details of the invoice already loaded and ready for payment.
To pay the invoice using the Checkout UI:
- Open another browser window.
-
In the address bar of the new browser window, paste the
payload.redirectvalue from the previous exercise and navigate to that page. - The Checkout UI for that invoice should open. In the Checkout UI, select the payment method and complete the purchase.
- After the transaction finishes processing, choose Done to exit.
At this point, the transaction has completed. In an application context, the user would return to the application.
Visit Next steps for information about how to view the transaction details of this, and other transactions, or continue to the next exercise.
Next steps
The exercises in this tutorial used Postman to call the Tilia APIs. For an example of how to integrate the payment flow demonstrated in this tutorial into a web page, see User-to-Integrator Purchase.
If you're curious, you can review the wallet balances of the users involved in this transaction by using the exercises in the Get info about transactions tutorial.
You can also return to the Transaction tutorials overview and find another transaction tutorial, or just go to the next transaction tutorial.
